Custom People Reports
In addition to the Reports available on the People Screen, you can also create and print your own Custom Reports with the fields and format you choose. The customized reports will be saved for future use.
How to Create a Custom Report
1. Open the People Setup and Custom Reports
Go to the "People" screen, select the "Setup" tab, and choose "Custom Reports."

2. Choose Who to Include
Select a Smart List to determine which people are included in the report.

This is where you determine which people appear in your report. Select a Smart List to filter the individuals based on the criteria you need (Ex. Members, Volunteers, New Visitors, etc). If you don’t see a Smart List that fits what you need, create one first on the People screen. The report will only include the people that the Smart List selects.

3. Give Your Report a Name
Enter a name for your custom report.

4. Choose the Fields to Include
First, select the "Add Field" button.

Then, select the fields you want to display from the available field lists to include them in your report.

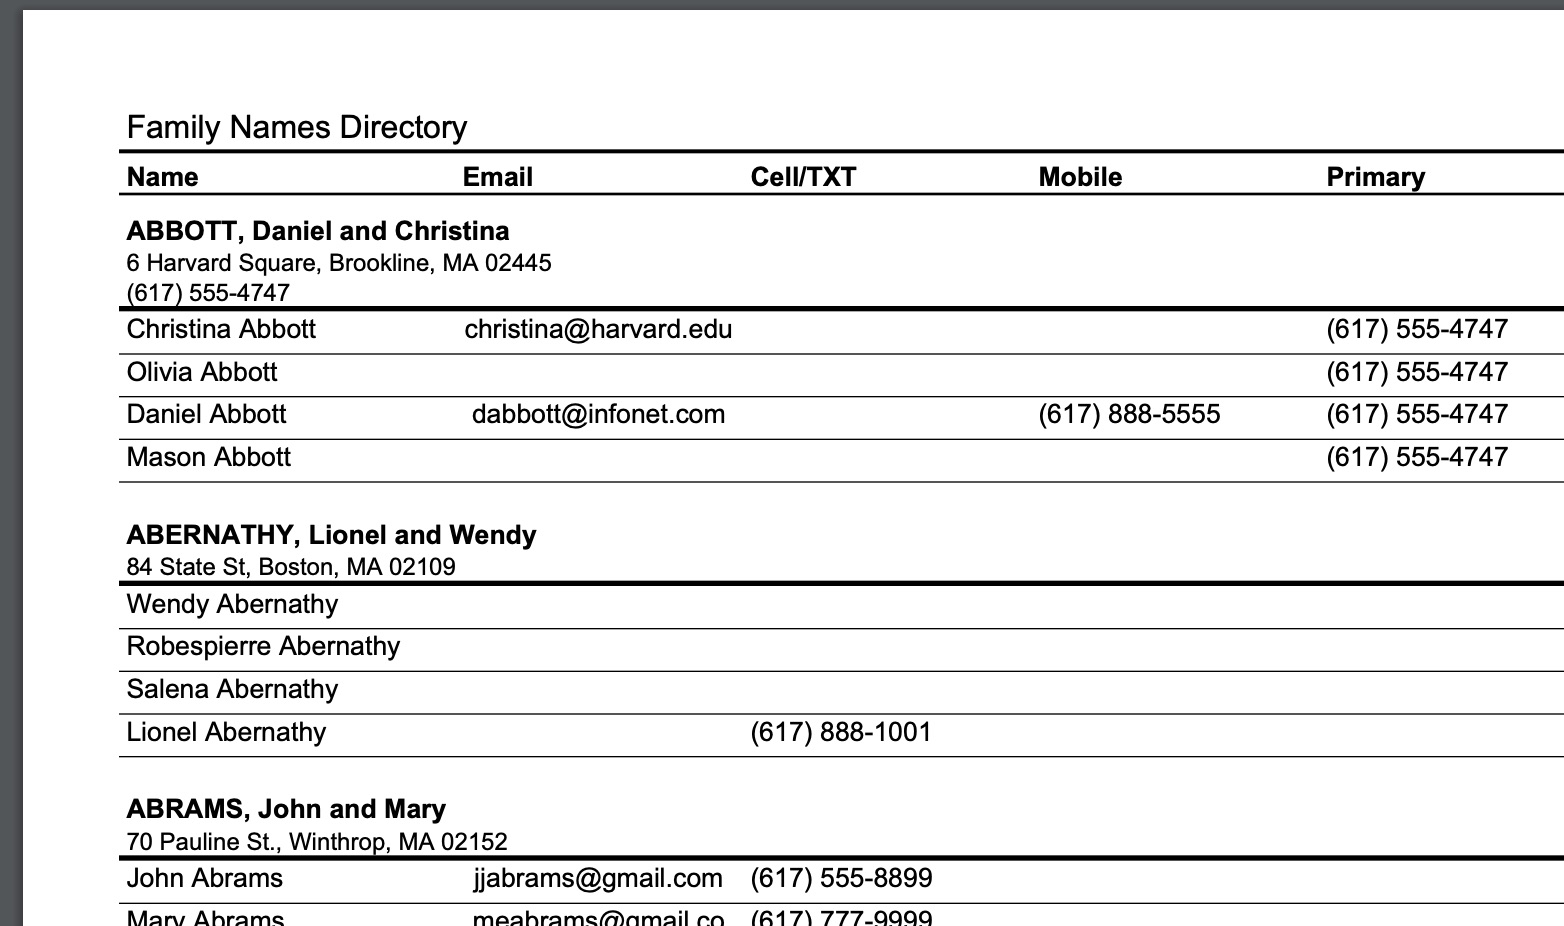
Individual vs. Family Reports
Reports created with individual fields (fields from the top "individual" fields section of the People Screen such as name, email, mobile phone, etc.) will print individual entries for each name in the Smart List you have selected. So each member of the family will be listed separately in the report.
Reports created with family fields (fields from the bottom "family" fields section of the People Screen such as family name, address, and family picture) will print one entry per family.
However, if you include an individual field in the report, the report will print the family information for each member of the family to include the different individual fields as well.
Formatting the Custom Reports
After creating your custom report and choosing your fields, the next step is formatting. This ensures your report is easy to read and fits your chosen paper size.
Start with the Width, Alignment, and Font Style.
1. Set Column Widths
Decide the width of each column based on the fields you included.

Examples:
- 1 column report (8.5"x11" paper with 0.5" margins) → column width = 7.5"
- 2 column report (including 0.5" margin between columns) → each column = 3.5"
2. Single vs. Multi-Column Layout
Decide if you want fields on the same row or each field on its own row.
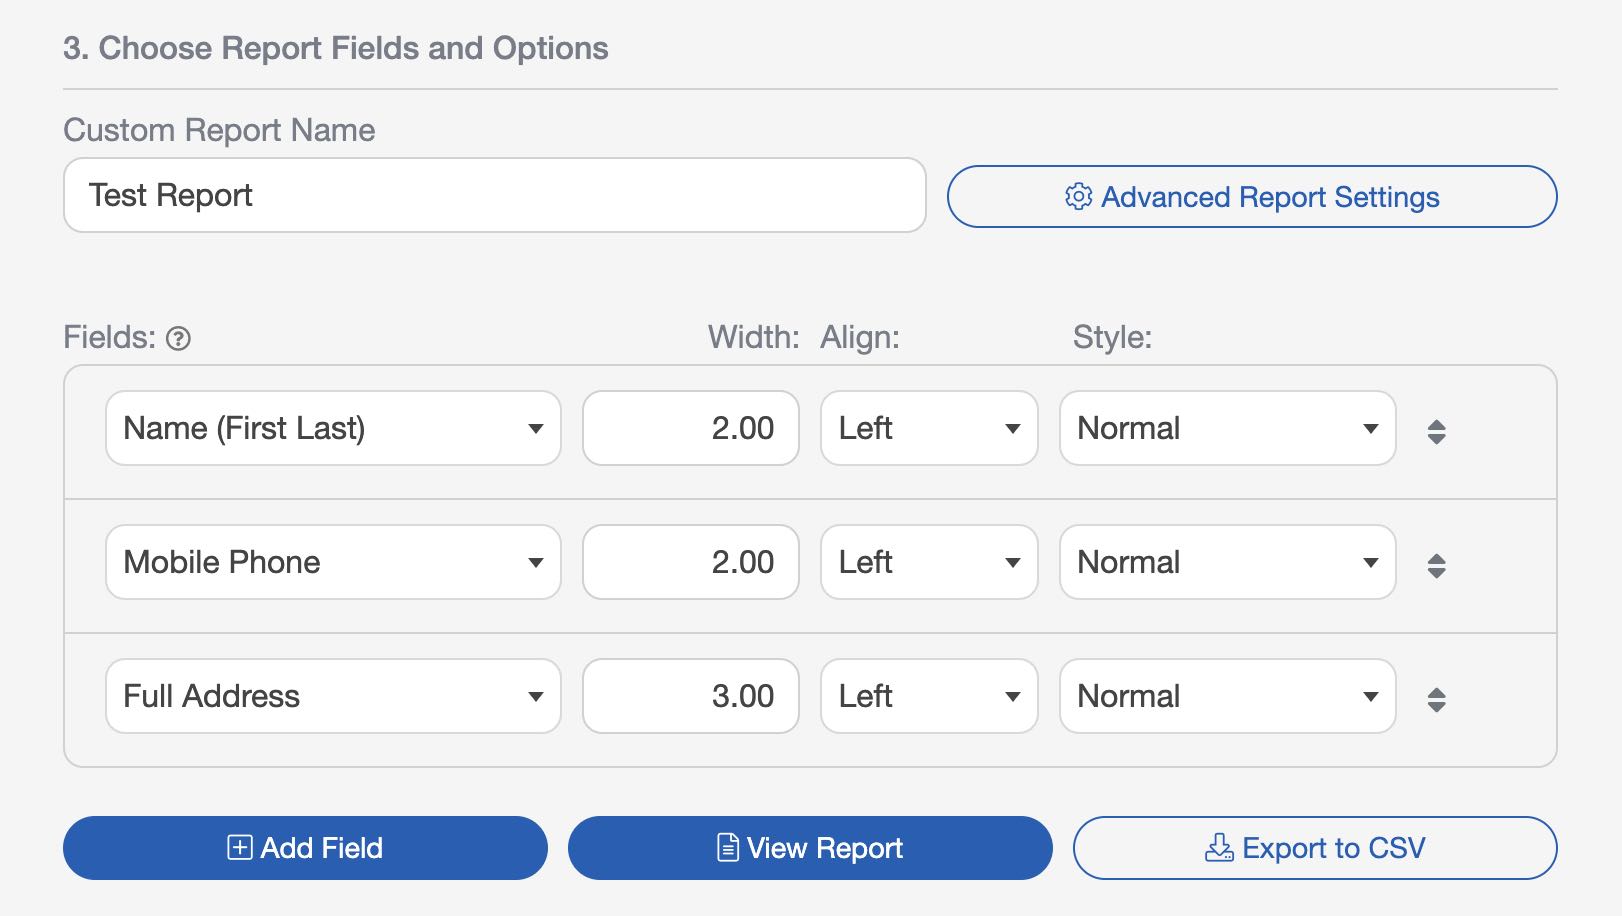
Single-Column Example:
All fields in one row (total = 7.5"):
- Name (last, first) = 2"
- Mobile Phone = 2"
- Full Address = 3"
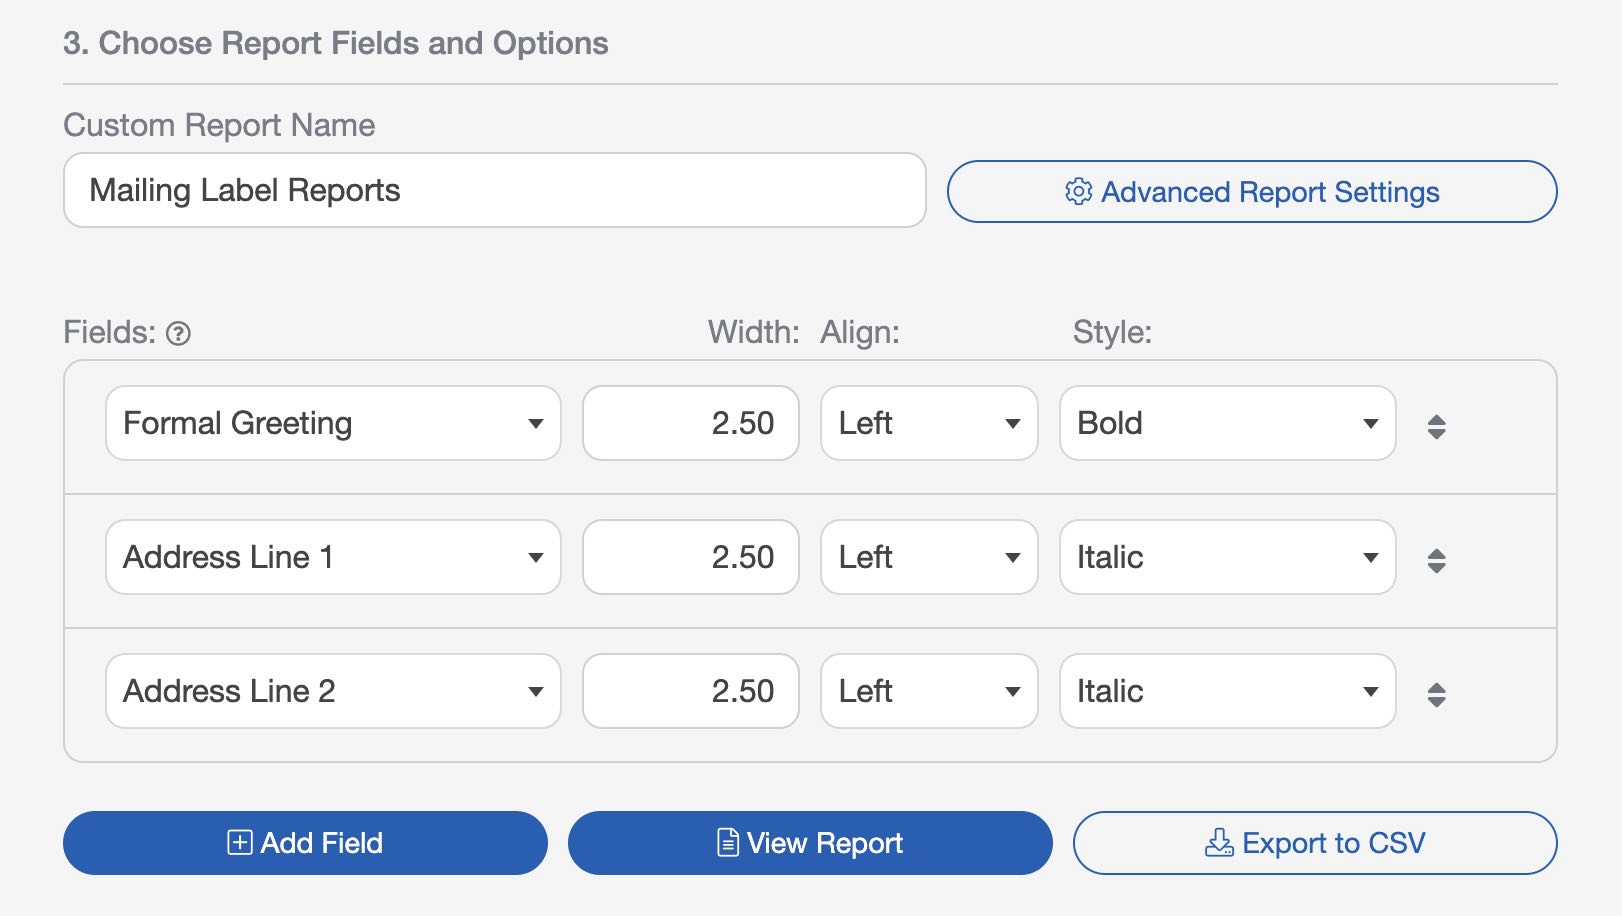
Multi-Column Example:
Each field on its own row (like mailing labels). For a 3-column layout:
- Formal Greeting = 2.5"
- Address Line 1 = 2.5"
- Address Line 2 = 2.5"
3. Using Blank Fields and Adding Pictures
Blank fields help position content or add spacing, especially when using pictures.
- If you want a blank space, create a new field, leave it blank, and set the width.
- Picture fields take up space across and down. Adjust blank fields to position other information around the image.
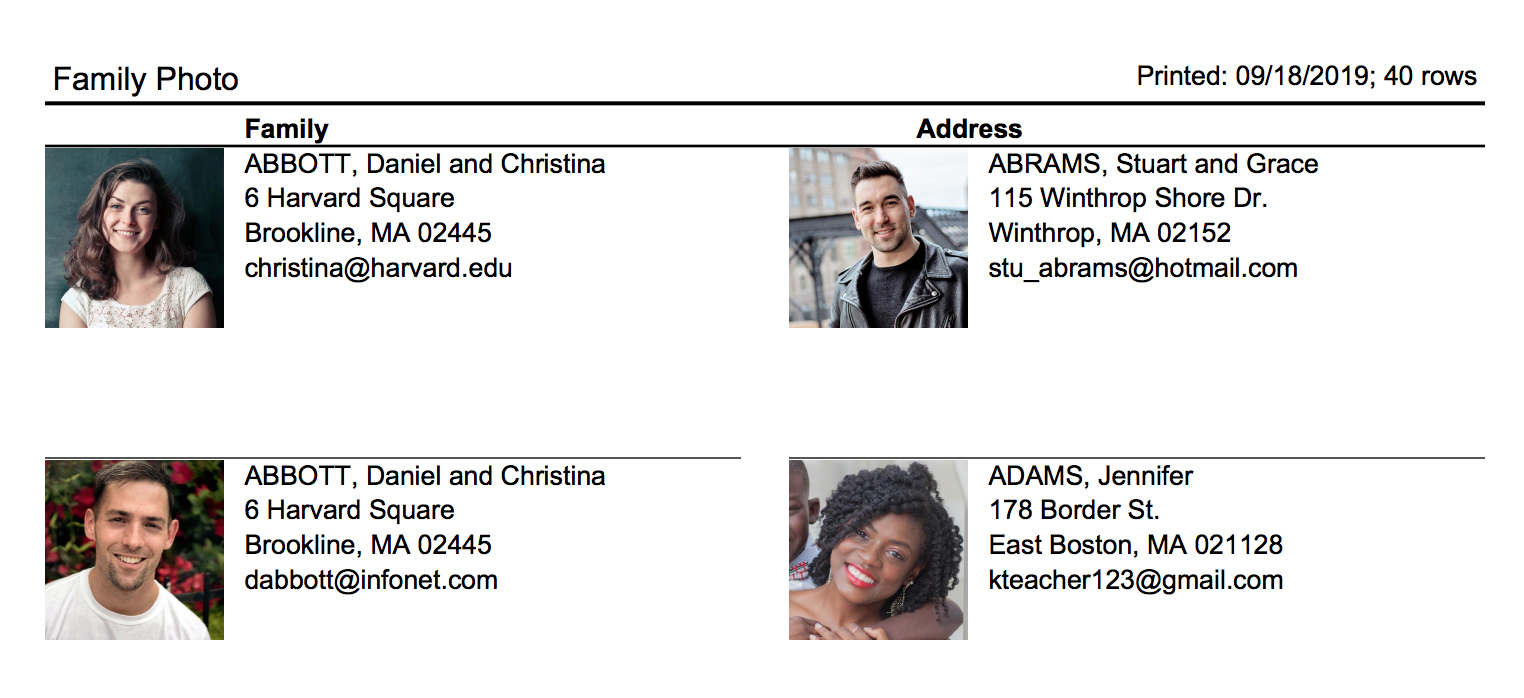
Example for a two-column picture directory:
- Family Picture = 1"
- Family Name = 2.5"
- Blank = 1"
- Address Line 1 = 2.5"
- Blank = 1"
- Address Line 2 = 2.5"
- Blank = 1"
- Email Address = 2.5"
4. Field Alignment and Font Style
Each field allows alignment: Left, Center, or Right, and font style.

5. Generate and Adjust
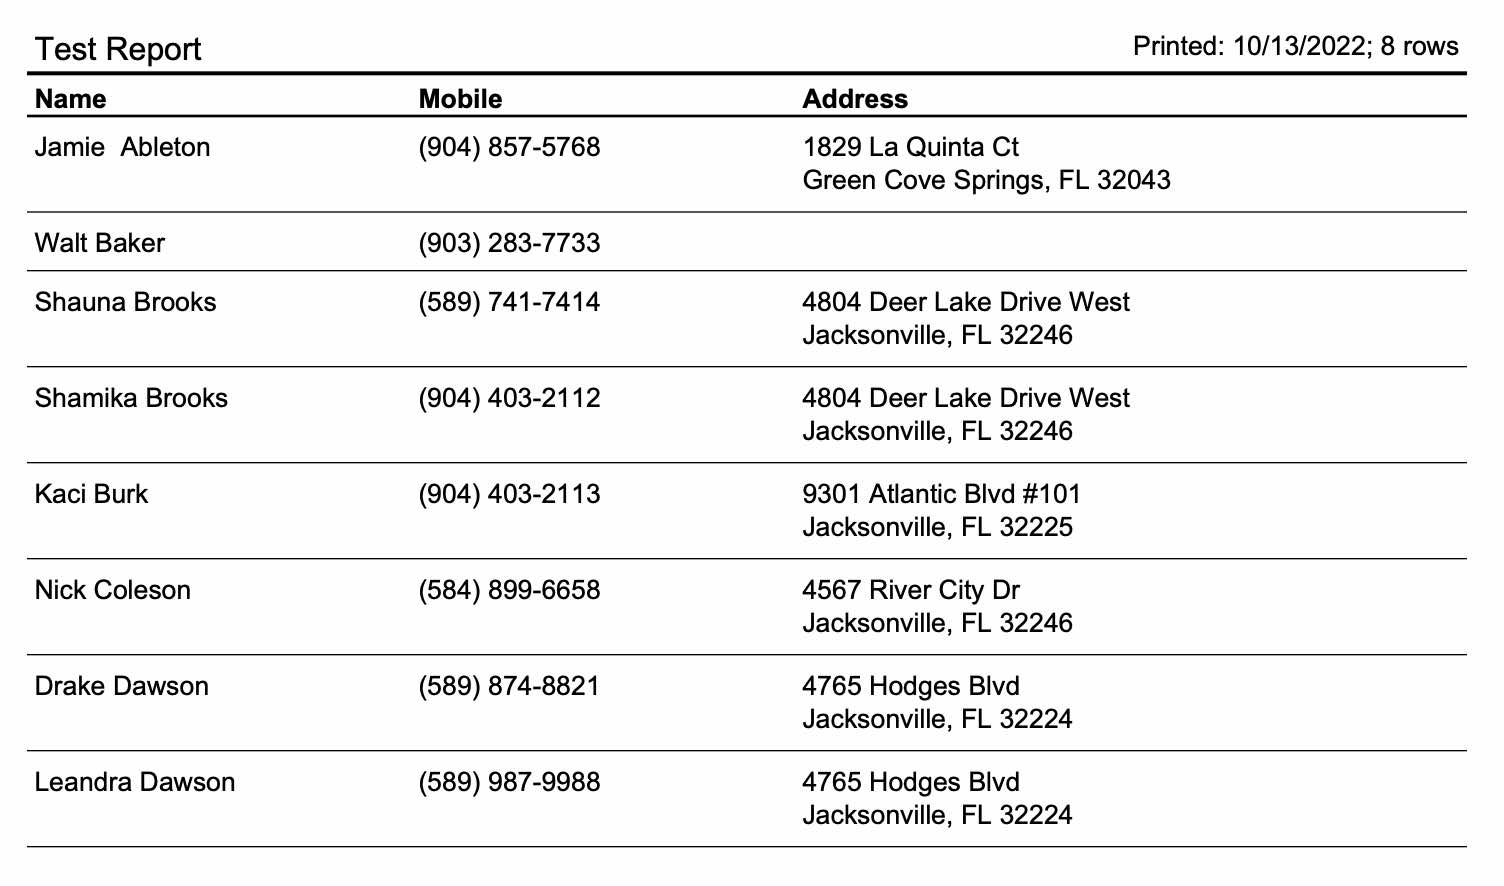
Select the "Generate Report" button to preview your report. Make adjustments to column widths, spacing, or alignment as needed.
Advanced Settings
You can further customize your church report by selecting the "Advanced Report Settings" button, where you can adjust margins, page orientation, and the number of columns for your report.

"Sort This Report By"
By default, your custom report will be sorted by Name (last, first). If you want to change the sorting field, go to the "Advanced Report Settings" screen and select a new "Sort This Report By" field from the selection box.

For example, if you want to print a master list of envelope numbers, you would change the "Sort By" field to "Envelope Number."
"Group Rows By"
By default, your custom report will be sorted by None. If you want to change the grouping, go to the "Advanced Report Settings" screen and select a new "Group Rows By" field from the selection box. When this option is selected, it will give you additional options below to add certain information.

For example, if you wanted to print a list of individuals within a family, you could Group By family, as shown below.
Margins
Margins are the blank space around the edges of your report page. They determine how much room your content has and affect column widths and overall layout.
- Top and Bottom Margins: Control the vertical spacing at the top and bottom of the page.
- Left and Right Margins: Control the horizontal spacing, affecting how wide your columns can be.

Page Orientation
Page orientation determines whether your report is printed in "Portrait"(vertical) or "Landscape" (horizontal) format. Choosing the right orientation helps ensure all your fields fit neatly on the page.
- Portrait: Taller than wide. Best for reports with fewer columns or shorter rows of information.
- Landscape: Wider than tall. Ideal for multi-column reports or when you need to include long fields such as full addresses or multiple data points per row.

Number of Columns
The number of columns you select here determines how your fields will align in multi-column layouts. Refer back to the formatting examples for guidance on field placement.

Column Gap
The column gap is the space between multiple columns in your report.
- Smaller gaps: More content fits on a single page, but columns may appear crowded.
- Larger gaps: Improves readability but reduces the space available for each column.

Row Height
Row height determines the vertical space allocated for each row of information in your report.
- Smaller row height: Fits more rows on a page, but may make the report appear cramped.
- Larger row height: Increases readability, especially if you include pictures or multi-line fields, but reduces the number of rows per page.

Cloning Reports
To clone or duplicate a custom report, select the "Clone" button. This will create an exact copy of your highlighted custom report.
